Return to All Blogs
How to Build a Jewellery E-Commerce Website with AI
Build a fully branded jewellery store in under an hour (no developer needed).


Dualite is an AI-powered app builder that lets you create and publish a full-stack jewellery e-commerce website without writing any code. Using the Lorvique template, you can go from a blank screen to a live, branded storefront with product pages, collection grids, and one-click Netlify publishing in under an hour.
What you need before you start
A free Dualite account
Your logo, product photography, and collection banners
30 to 60 minutes
Can you build a jewellery e-commerce store with AI without coding?
Yes. Dualite is an AI vibe coding platform that generates and manages all the code automatically in the background. You interact entirely through a prompt bar and visual editor. The Lorvique template is built specifically for jewellery brands — it includes a luxury hero section, full navigation, collection grids for rings, necklaces, bracelets, and earrings, and editorial product pages designed to give your brand a premium feel from the first scroll.
How to build a jewellery e-commerce website with Dualite : Step by step
Step 1: Log in and open your dashboard
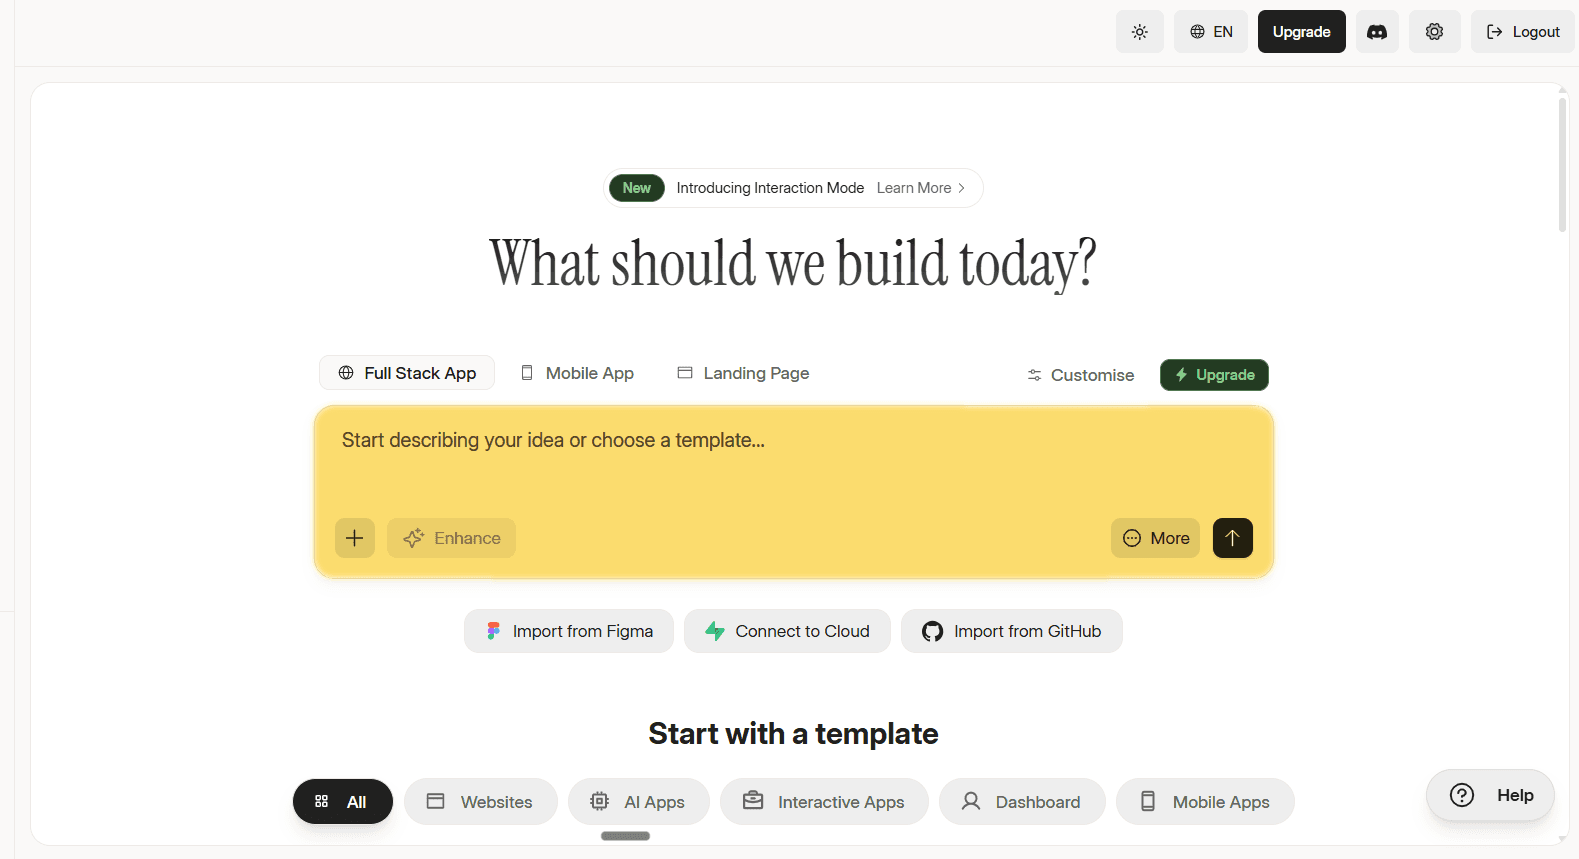
Go to dualite.dev and log in. You'll land on a clean dashboard with a prompt bar asking "What should we build today?" - this is your starting point for every project on Dualite.
Step 2: Browse the template library

Scroll down to the "Start with a template" section. Templates are organised by category: Websites, AI Apps, Interactive Apps, Dashboards, and Mobile Apps. For a jewellery store, browse the Websites section — look for templates that put visuals and product imagery first.
Step 3: Select the Lorvique template

Find and select the Lorvique template ; designed specifically for jewellery brands. It includes a luxury hero section, collection grids for rings, necklaces, bracelets, and earrings, and editorial product pages built for a premium aesthetic. Click Lorvique to preview it, then hit "Use for Free" to make it your starting point.
Step 4: Watch your store generate in real time
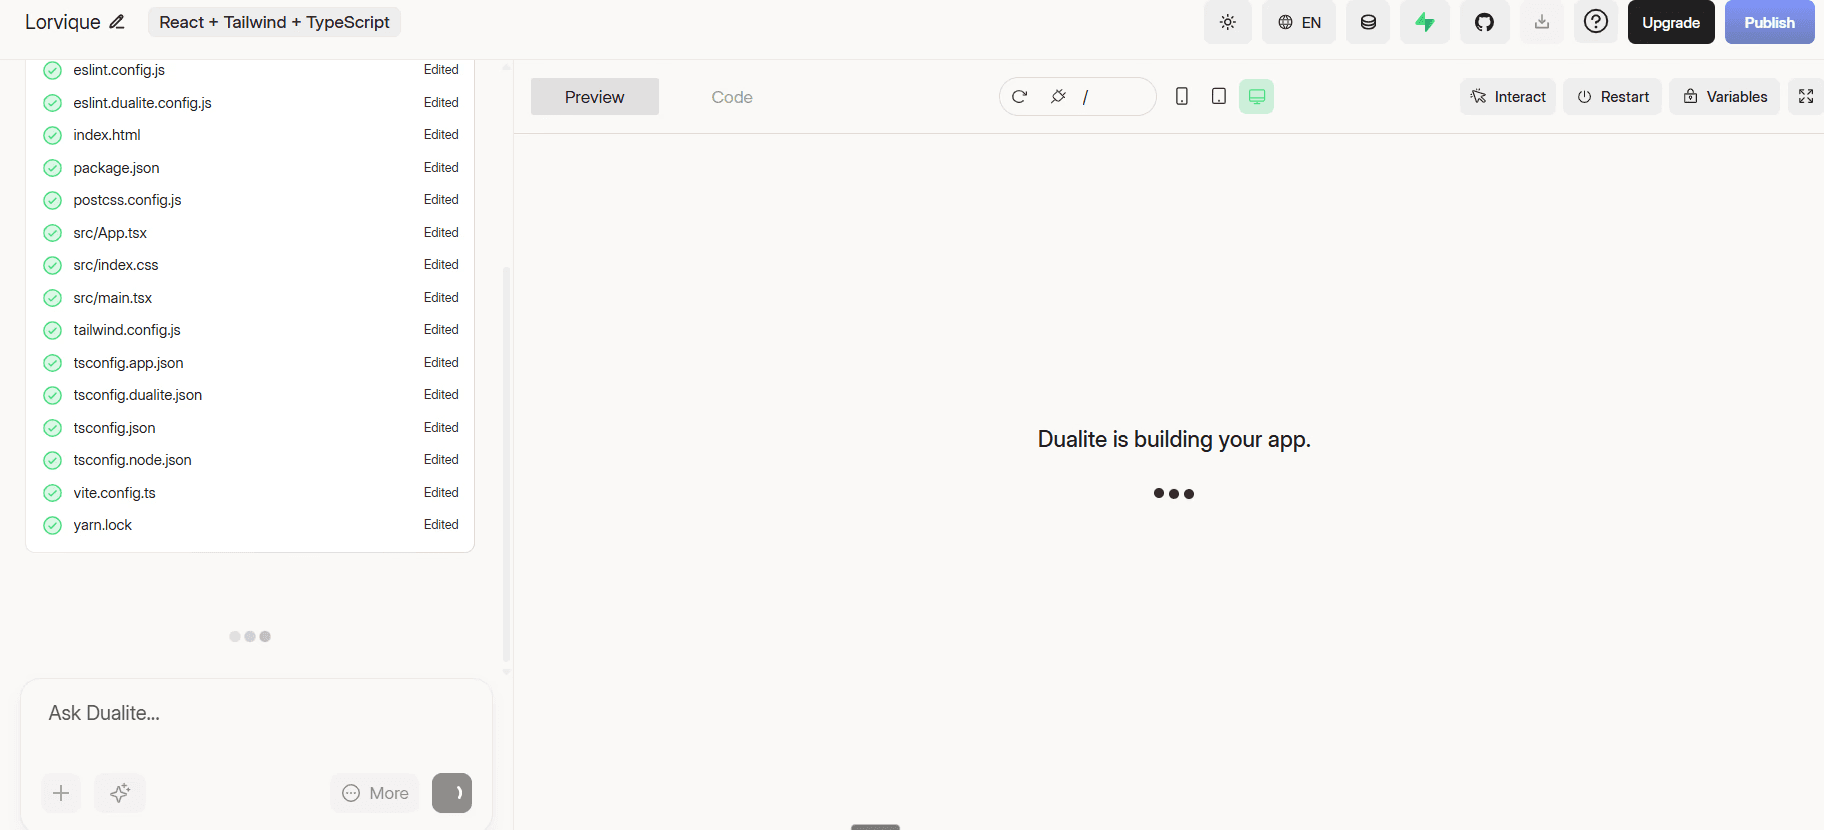
Once you select Lorvique and submit your prompt, Dualite builds everything instantly. The live preview on the right shows your full storefront navigation, hero section, collection pages, and CTAs exactly as customers will see it. You never need to touch the code, but it is all there, clean and accessible, if you ever want it.
Step 5: Upload your brand assets and product photography
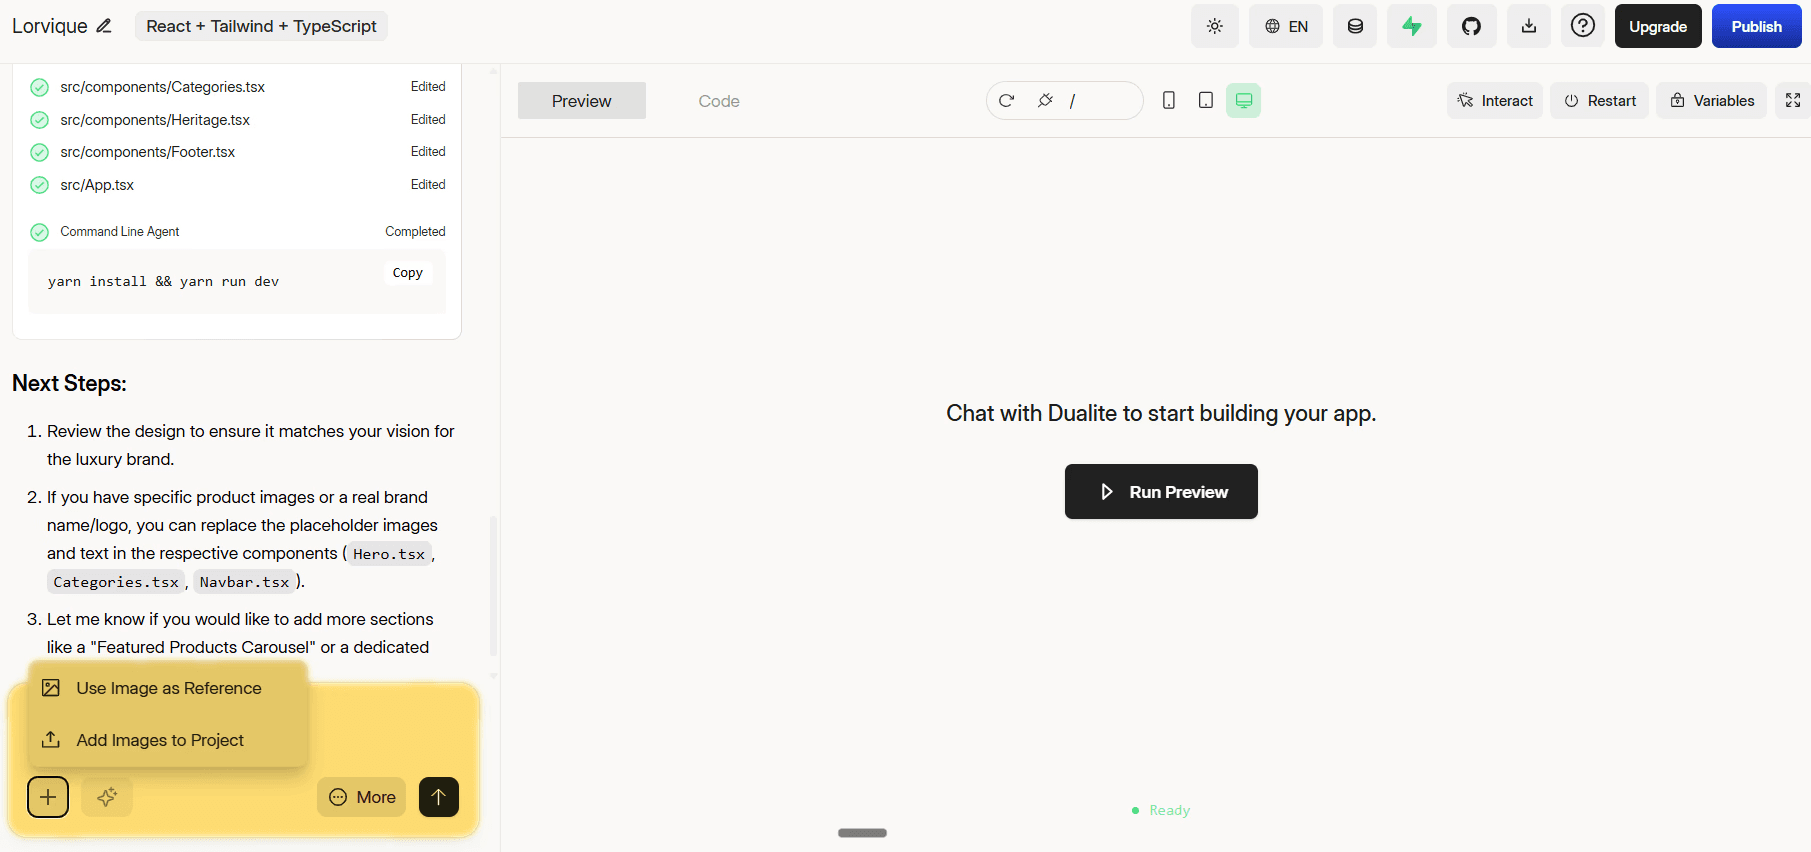
Click the + button in the chat panel. You will see two options:
Use image as reference : Upload a mood board, screenshot, or design inspiration. The AI reads your visual direction and applies it across the entire store without you needing to describe it in words.
Add images to project : Upload your actual assets: logo, product photography, collection banners, sizing guides, and any custom UI elements. This is what makes Lorvique stop looking like a template and start looking like your brand.
Use both options together for the best results. Reference images guide the AI's decisions. Project images populate your actual pages.
Step 6: Refine your store with chat prompts

Use the "Ask Dualite" chat bar to make specific changes. Describe exactly what you want adjusted — a product page layout, a collection grid, a colour, a font. Use the Enhance button to let Dualite suggest improvements automatically. Switch between the Preview and Code tabs at any time to check how everything looks or dig into the code directly. This is the step where the store goes from good to exactly right.
Step 7: Publish live to Netlify
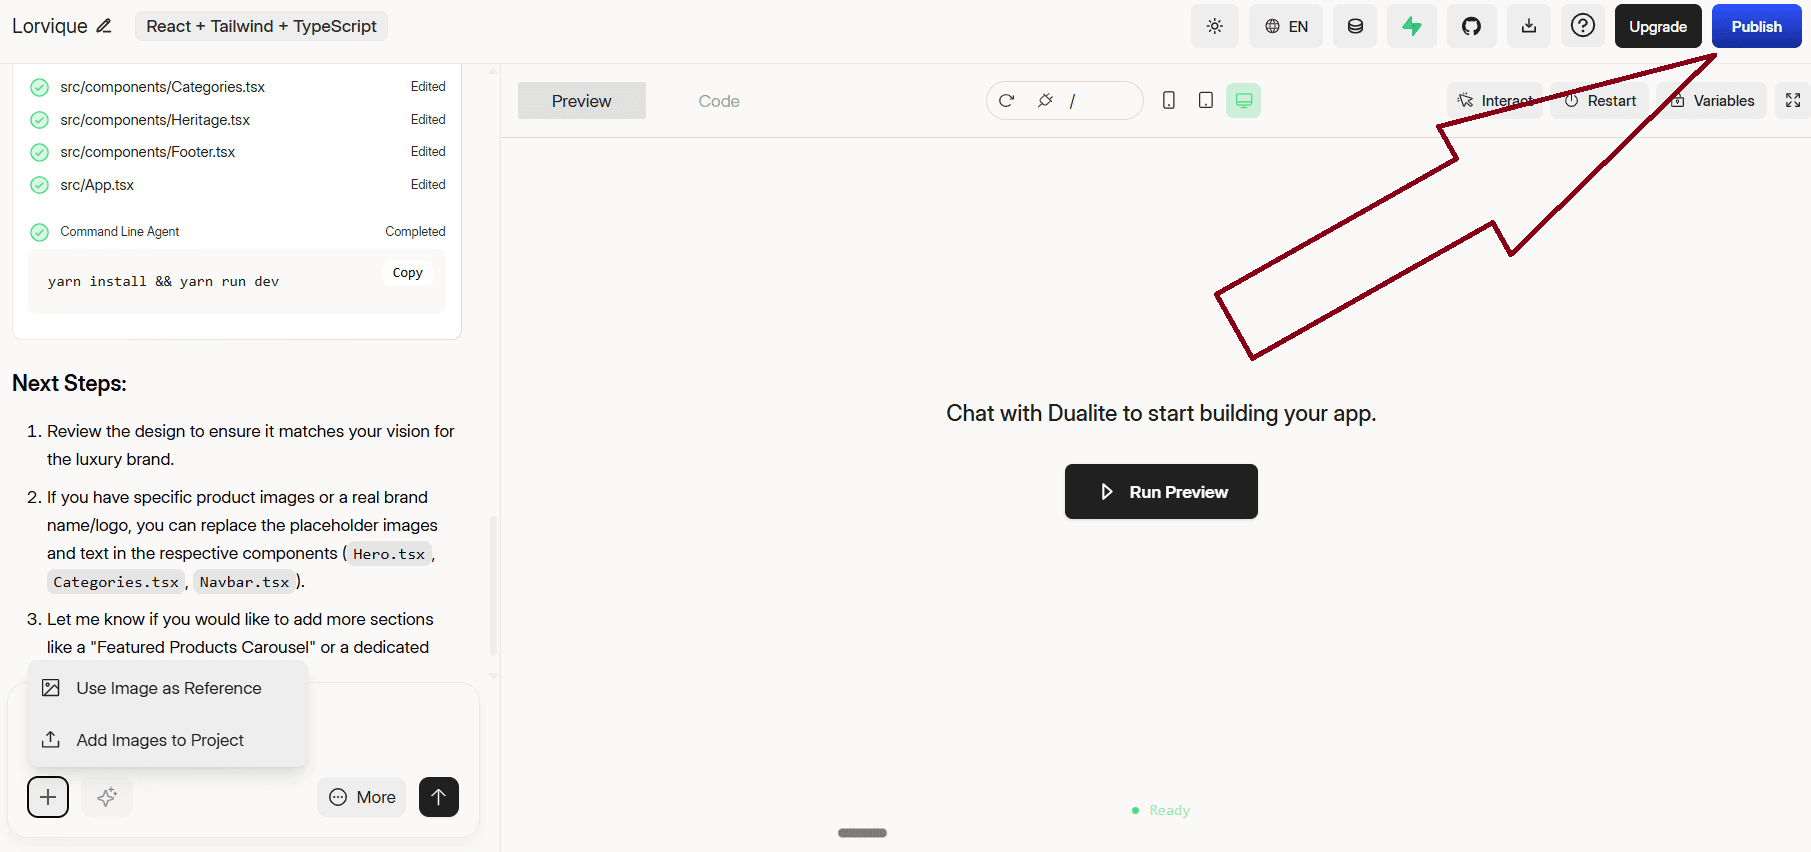
When you are ready, click the Publish button in the top right corner. Connect to Netlify and your store goes live fast, globally distributed, and ready for customers from day one. From your first uploaded product photo to a live, shoppable URL, that is the entire process.
Frequently asked questions
How long does it take to build a jewellery store with Dualite?
Most users have a fully branded, live storefront within 30 to 60 minutes. The longest part is typically uploading and organising your product photography.
Do you need coding skills to use Dualite?
No. Dualite generates and manages all code automatically. You build entirely through prompts and a visual editor. The underlying code is accessible if you want it, but it is never required.
Does Dualite work for other types of E-commerce?
Yes. Dualite has purpose-built templates for sneaker brands, fashion, and other product categories each with layouts designed for that specific market.
What makes Dualite different from other website builders?
Dualite is a full-stack AI builder, not a drag-and-drop website tool. It generates real, deployable code not a visual wrapper. Your store can be extended, customised, or handed to a developer at any point without starting over.
Ready to launch your jewellery store?
Start with Dualite and the Lorvique template free to begin, live in under an hour.
Overview
Ready to build real products at lightning speed?
Try the AI platform to turn your idea into reality in minutes!
Other Articles

The Sports Data Problem: Why AI Agents Are Better at Fan Analytics Than Human Analysts
The Short Answer
Sports fan analytics is a data problem that human analysts cannot solve at scale. An IPL franchise with 5 million fans generates tens of millions of behavioral data points per season across ticket purchases, merchandise, digital content engagement, app behavior, and social interaction. Human analysts cannot process this volume at the frequency needed for real-time campaign decisions. AI agents that continuously analyze fan behavioral data, identify engagement patterns, and surface actionable insights transform fan analytics from a periodic reporting exercise into a continuous operational capability. According to McKinsey's 2026 Sports Business report, sports organizations that deploy AI for fan analytics increase their fan database revenue yield by an average of 23% by identifying high-value fan segments and targeting them with relevant commercial offers.
The Fan Data Problem in Sports
Sports organizations accumulate fan data from multiple sources that are rarely connected:
Ticketing data: Who bought tickets, which matches, which seat categories, how far in advance, at what price points, whether they attended as individuals or groups.
Merchandise data: Who bought, what products, around which match or event, at which price points.
Digital engagement data: Who opened emails, clicked links, watched digital content, engaged with social posts, used the app.
Streaming data: For leagues with OTT platforms, who streamed which matches, for how long, in which markets.
Stadium operations data: Which fans used which gates, which food outlets, which merchandise stores.
Each of these data streams is typically managed in a separate system by a separate team. The commercial value of the data comes from connecting them: identifying that a fan who bought a jersey in March is 3x more likely to buy a premium ticket for a rivalry match than a fan who has only attended on free or discounted tickets. Human analysts can produce this insight for a sample. AI agents can produce it for every fan, continuously.
What AI Fan Analytics Actually Enables
Automated Fan Segmentation
Instead of manually defining fan segments (which requires analyst time and becomes outdated), AI continuously clusters fans based on behavioral similarity. The segments it identifies reflect actual fan behavior rather than demographic assumptions.
Common behavioral segments that AI analytics identifies in sports fan databases:
High-value attenders: Attend most home matches, buy premium categories, renew early, low price sensitivity
Merchandise-first fans: High merchandise purchase frequency, lower ticket purchase frequency, engage primarily through product
Digital-only fans: High content engagement, low ticket purchase, typically outside the attending geography
Lapsed high-value fans: Historical high engagement, recent drop-off in engagement and purchase activity
Growth fans: Recent first purchase or first attendance, early signals of growing engagement
Each segment gets different communication strategies and commercial offers. AI identifies which fans belong in which segment and updates the classification continuously as fan behavior changes.
Churn Prediction
A season ticket holder who does not renew represents significant lost revenue. Predicting which fans are at risk of churning early enough to intervene is one of the highest-value fan analytics applications.
AI churn prediction models use behavioral signals to identify fans who are trending toward disengagement: reduced email open rates, fewer match attendances than previous seasons, merchandise purchase drop-off, decreased digital content engagement. Fans flagged as churn risk receive targeted re-engagement communications before they make an explicit non-renewal decision.
For Indian cricket franchises with season ticket holders, churn prediction that enables proactive re-engagement typically produces 15 to 25% improvement in retention versus reactive renewal campaigns.
Propensity Scoring for Commercial Offers
Not all fans have equal propensity to purchase for every commercial offer. AI propensity scoring assigns each fan a likelihood score for each commercial action: ticket purchase for an upcoming match, merchandise purchase of a specific product category, premium ticket upgrade, hospitality package purchase.
This scoring enables targeted commercial campaigns that send the most relevant offer to the fans most likely to respond. A hospitality package offer to fans with high hospitality propensity scores converts at 4 to 6 times the rate of the same offer sent to the full fan database.
Real-Time Match-Day Insights
For organizations with stadium WiFi, app, and point-of-sale data, AI agents provide real-time match-day insights: which merchandise is selling fastest (triggering restocking alerts), which food outlets are experiencing queues (triggering operational adjustments), which entry gates are congested (triggering steward deployment). These operational insights are only possible with real-time data processing that human analysts cannot provide at the required frequency.
Fan Analytics Maturity Model
Maturity Level | Capability | Tools | Impact |
|---|---|---|---|
Level 1: Reporting | Historical data compiled periodically | Manual Excel/BI tools | Understand what happened |
Level 2: Segmentation | Fan groups defined by behavior | BI tools with some automation | Target campaigns by segment |
Level 3: Prediction | Churn risk and purchase propensity | ML models, basic AI | Proactive re-engagement, targeted offers |
Level 4: Real-Time | Live behavioral signals driving decisions | AI agents, real-time data pipelines | Match-day optimization, instant personalization |
Source: McKinsey 2026 Sports Business Report, Dualite sports analytics framework
Most Indian sports organizations are at Level 1 or Level 2. The organizations that will lead in fan monetization are building toward Level 3 and Level 4.
The India-Specific Fan Analytics Context
Indian sports fan analytics has specific characteristics:
WhatsApp as primary engagement channel. Email-open-rate-based engagement models miss the primary fan engagement channel in India. Fan analytics for Indian sports must incorporate WhatsApp engagement data.
Regional language signal. Which language a fan prefers for communication is a behavioral signal that predicts engagement with regional-language content and regional identity-based campaigns. AI fan analytics that incorporates language preference data produces better segment definitions than language-agnostic models.
Tier classification as a fan behavior signal. Fans in tier-1 metro cities, tier-2 cities, and rural areas have different attendance patterns, digital engagement behaviors, and commercial response rates. AI segmentation that incorporates geography with behavioral data produces more commercially actionable segments.
Dualite builds fan analytics AI agents for Indian sports organizations with WhatsApp engagement integration, regional language segmentation, and Indian sports calendar-aware behavioral modeling.
Conclusion
Fan analytics in sports is genuinely a problem that AI solves better than human analysts, not because AI is smarter but because the data volume, the required frequency, and the number of fans requiring individual assessment exceed what human analysis can deliver at the speed commercial decisions require. Sports organizations that build AI fan analytics capability will identify revenue opportunities that manual reporting misses and execute on those opportunities faster than organizations relying on periodic analyst reports.
Frequently Asked Questions
1. What is sports fan analytics and why is it a data problem?
Sports fan analytics is the analysis of fan behavioral data to understand fan engagement, identify commercial opportunities, and predict future fan behavior. It is a data problem because modern sports organizations accumulate fan data at a volume and variety that exceeds manual analysis capacity. An IPL franchise with millions of fans generating behavioral signals across ticketing, merchandise, digital, and app platforms requires AI to process and act on this data at the required speed and scale.
2. What is AI churn prediction in sports fan analytics?
AI churn prediction identifies fans who are trending toward disengagement before they make an explicit non-renewal decision. The model uses behavioral signals (reduced email engagement, fewer match attendances than previous season, merchandise purchase drop-off) to score each fan's churn risk. High-risk fans receive targeted re-engagement communications while there is still time to reverse the trend. Organizations that deploy churn prediction before renewal season consistently outperform those that rely on reactive renewal campaigns.
3. What is fan propensity scoring and how does it improve campaign ROI?
Fan propensity scoring assigns each fan a likelihood score for each commercial action: ticket purchase, merchandise purchase, hospitality upgrade, premium package. Instead of sending all commercial offers to all fans, AI-powered campaigns match offers to fans with high propensity for that specific offer. The result is higher conversion rates (because the offer is relevant), lower communication frequency (because fans receive only relevant offers), and higher overall campaign ROI.
4. What data does AI fan analytics require?
Minimum useful data: ticket purchase history (which matches, seat categories, prices), merchandise purchase history, and email/WhatsApp engagement data. This is enough to build basic segmentation and propensity models. Enhanced analytics adds app behavioral data, social engagement data, streaming data (for leagues with OTT), and stadium WiFi/app data for match-day insights. Most organized Indian sports organizations have the minimum data; the gap is in connecting and activating it.
5. How does AI fan segmentation differ from traditional demographic segmentation?
Demographic segmentation groups fans by age, gender, location, and income. AI behavioral segmentation groups fans by what they actually do: when they buy tickets, what they buy merchandise for, how they engage with digital content, what events trigger a purchase. Behavioral segments are more predictive of commercial response than demographic segments because they reflect actual fan relationship patterns with the franchise rather than demographic assumptions about group behavior.
6. What are the highest-value fan analytics use cases for Indian cricket franchises?
In priority order: churn prediction for season ticket holders (highest revenue risk to protect), merchandise purchase propensity for targeted offers (highest conversion improvement opportunity), digital engagement-to-attendance conversion (identifying digital fans who could become ticket buyers), and lapsed high-value fan re-engagement (identifying former high-spenders who have dropped off). Each of these has clear, measurable commercial impact.
7. Can AI fan analytics work for sports organizations with smaller fan databases?
Yes, but with lower model confidence. AI analytics produces more reliable insights with larger datasets. For organizations with fewer than 10,000 identified fans, simpler segmentation approaches (purchase frequency, recency, and value scoring) are more appropriate than complex behavioral clustering models. As the fan database grows, the analytics sophistication can increase. Start with what the data supports.
8. How does WhatsApp engagement data improve fan analytics for Indian sports?
WhatsApp is the primary engagement channel for Indian sports fans. A fan analytics model that uses only email engagement data misses the signal from the most-used channel. Incorporating WhatsApp message open rates, link clicks, and response behavior significantly improves the accuracy of engagement scoring and churn prediction models for Indian fans. Organizations that integrate WhatsApp Business API data into their fan analytics have a more complete picture of fan engagement than those relying on email alone.
9. What privacy considerations apply to AI fan analytics in India?
The Digital Personal Data Protection Act (DPDPA) 2023, effective from 2024 onwards, requires consent for collection and processing of personal data in India. Fan analytics requires valid consent for using ticket purchase, merchandise, and digital engagement data. Most organized sports organizations collect consent through their ticketing terms and app permissions. The analytics data should be used only for the purposes consented to and should not be shared with third parties without additional consent.
10. How long does it take to build a useful AI fan analytics capability for an Indian sports franchise?
For a basic segmentation and propensity scoring model using existing ticketing and merchandise data: 6 to 10 weeks. This includes data audit and cleaning (typically the longest phase for organizations with data in multiple systems), model development, validation against historical commercial outcomes, and integration with the campaign execution system. The ROI from the first targeted campaign using propensity scoring typically covers the implementation cost.
Related: How Sports Teams Are Using AI for Fan Engagement in 2026 | IPL, ISL, PKL: How Indian Sports Leagues Can Use AI Agents | The 3-Layer Rule for AI Agents in Regulated Industries
Sports Marketing AI
Raj Gupta

The 3-Layer Rule for AI Agents in Regulated Industries: Perception, Logic, Human Judgment
The Short Answer
The 3-Layer Rule for AI agents in regulated industries divides every automated workflow into three distinct layers, each handled by a different type of system. Layer 1 is Perception: AI handles tasks involving unstructured input (reading scanned documents, classifying images, extracting data from variable-format files). Layer 2 is Logic: deterministic, auditable code handles all calculations, matching, routing, and portal interactions. Layer 3 is Human Judgment: a human reviews prepared work and makes every irreversible decision. This architecture produces AI agents that are trustworthy, auditable, and adoptable in the healthcare, finance, legal, and government contexts where errors are expensive and accountability is non-negotiable. According to Gartner's 2026 AI implementation report, 67% of AI agent failures in regulated industries are attributable to violating this separation: using AI where deterministic logic would be more reliable, or attempting full automation where human judgment is required.
Why Regulated Industries Break Generic AI Agents
The AI agent frameworks built for consumer applications and general software development do not work in regulated industries without significant redesign. The reason is a fundamental mismatch between what these frameworks optimize for and what regulated environments require.
General AI agent frameworks optimize for flexibility and goal completion. An agent given a goal will attempt to achieve it through whatever means its reasoning capabilities allow. This is appropriate for tasks where the path to the goal is variable and errors are low-cost (drafting an email, summarizing a document, generating code).
Regulated environments have different requirements:
Errors are expensive and sometimes irreversible. A claim submitted with incorrect billing codes costs days of payment delay and requires rework. A financial transaction executed incorrectly may not be reversible. A compliance filing with wrong data triggers regulatory attention.
Every action must be traceable. A regulator asking "why was this value entered in this field on this date" expects a specific, documented answer. "The AI decided it" is not an answer. The source data, the rule applied, and the human who approved the action must all be identifiable.
Accountability must be assignable to a human. Regulated industries have legal accountability frameworks. Someone is responsible for a hospital claim, a financial filing, or a legal document. That person cannot delegate the accountability to an AI system.
The 3-Layer Rule is the architectural response to these constraints.
Layer 1: AI for Perception
AI is genuinely better than deterministic rules at one specific class of task: understanding variable, unstructured inputs.
A scanned hospital bill is an unstructured image. The billing codes, quantities, and prices might be in a table, or in a list, or in a hybrid format. The handwriting might be clear or faint. The layout might match a template or vary by department. Rule-based extraction code cannot handle this variability reliably. A vision AI model can.
A vendor invoice from a new supplier has an unknown format. The supplier name, amount, line items, and tax details might be anywhere on the page. Template-based parsing fails for the first invoice from any new vendor. AI extraction succeeds.
A customer complaint message might be written formally or informally, clearly or ambiguously. A keyword-based classifier will miss most complaints. An AI language model classifies them correctly.
Layer 1 design principles:
AI in Layer 1 produces structured output, not decisions. The vision model reads the bill and returns a JSON object with extracted values. The language model classifies the message and returns a category. What happens next is determined by Layer 2, not by further AI reasoning.
Layer 1 output must include confidence scores. When the AI is uncertain about an extracted value, it says so. Low-confidence outputs are flagged for human review rather than passed to Layer 2.
Layer 1 does not make consequential decisions. It perceives and structures. Decision-making belongs to Layer 2 and Layer 3.
Layer 2: Deterministic Logic for Execution
Once Layer 1 has produced structured data, every subsequent action should be deterministic. The same inputs must always produce the same outputs. Every action must be logged with its source and reasoning.
This is the layer most AI agent builders violate. Having used AI to extract data from a document, they continue using AI for the matching, calculation, and portal interaction steps where deterministic code would be more reliable.
The specific actions that belong in Layer 2:
Matching: Does this invoice match a purchase order? Does this claim ID correspond to a patient record? Does this document filename correspond to a category? These are rule-based lookups with configurable tolerance thresholds. Deterministic.
Calculation: What is the sum of all billing code amounts? Does it match the expected total? What is the TDS amount on this vendor payment? What is the early payment discount value? These are arithmetic operations. Deterministic.
Portal interaction: Navigate to this URL. Click this element. Enter this value in this field. Read back the field to verify. These actions are performed the same way every time. Deterministic.
Verification: Does the field value entered match the source manifest? Is every required document present in the upload table? Do the fields across all portal tabs match the expected values? These are comparison operations. Deterministic.
Layer 2 design principles:
Every Layer 2 action is logged with: the input data, the action taken, the output produced, and the timestamp. This log is the audit trail.
Layer 2 fails loudly and specifically. When a verification check fails (the amount does not match, the document is missing), Layer 2 stops the process and reports the specific failure with the specific values. It does not attempt to continue or make a judgment about whether to proceed.
Layer 2 never takes irreversible actions autonomously. Portal submissions, payment authorizations, and filing confirmations are handed to Layer 3.
Layer 3: Human Judgment for Irreversible Decisions
Layer 3 is not a failure of the AI system. It is the correct allocation of human accountability to decisions that require it.
The actions that belong in Layer 3:
Final submission. Submitting a hospital claim, filing a tax return, authorizing a payment, confirming a contract. These actions are difficult or impossible to reverse and carry financial and regulatory consequences.
Exception resolution. When Layer 2 identifies a problem (amount mismatch, missing document, unrecognized supplier), a human makes the decision: fix the underlying data and reprocess, handle the exception manually, or skip this item entirely.
Review gate approval. Before Layer 2 begins executing against a batch of work, a human reviews the prepared manifest: which items are ready, which are skipped and why, which have warnings. Explicit approval is required. Silence is not approval.
Authentication. Login credentials for regulated government portals and financial systems belong with the human operator. Credential management is a security and compliance boundary.
Layer 3 design principles:
The review gate shows the human exactly what the system prepared. Ready items, skipped items with reasons, warnings on borderline items. The human can act on this information in minutes.
Layer 3 is designed for speed. The goal is to minimize the time the human spends on Layer 3 without eliminating it. A well-designed review gate takes 5 to 15 minutes for a batch that would have required a full working day without automation.
Layer 3 is the compliance anchor. When a regulator asks who authorized a portal submission or payment, the answer traces to the human who approved at Layer 3.
Why This Architecture Succeeds Where Others Fail
Failure Mode | Full Automation | AI Throughout | 3-Layer Rule |
|---|---|---|---|
Scanned document extraction error | Submits wrong data | May catch it | Caught at Layer 1 verification |
Calculation error | Submits wrong total | Possible | Impossible (Layer 2 is deterministic) |
Portal interface change | Silently fails or wrong entries | May recover | Fails loudly, specific error |
Compliance audit | Cannot trace decision | Partially traceable | Full audit trail, every step |
Irreversible wrong submission | Happens | Risk exists | Structurally prevented at Layer 3 |
Operator illness | Work stops | Work stops | Work continues (AI handles execution) |
Source: Dualite engineering design principles, 2026
Dualite applies the 3-Layer Rule to every AI agent it builds across healthcare, finance, retail, and sports operations. The architecture is not optional for regulated domains. It is the correct design.
Conclusion
The 3-Layer Rule is not a restriction on what AI can do. It is the correct allocation of AI, deterministic logic, and human judgment to the tasks each handles best. AI perceives because it is genuinely better at understanding variable, unstructured input than rule-based parsers. Deterministic logic executes because predictable, auditable behavior is more valuable than flexible reasoning for defined actions. Human judgment decides because accountability in regulated domains requires a human decision-maker for irreversible actions. Organizations that implement this architecture build AI agents that work in production, survive regulatory scrutiny, and earn operator trust. Organizations that skip it build agents that work in demos and fail in production.
Frequently Asked Questions
1. What is the 3-Layer Rule for AI agents in regulated industries?
The 3-Layer Rule divides AI agent architecture into three layers: Layer 1 (Perception, where AI handles unstructured input extraction), Layer 2 (Logic, where deterministic code handles all calculations, matching, and portal interactions), and Layer 3 (Human Judgment, where a human reviews prepared work and makes irreversible decisions). This architecture produces agents that are reliable, auditable, and compliant in regulated environments.
2. Why should not AI handle everything end to end in an automated workflow?
Full AI end-to-end automation fails in regulated industries because AI is non-deterministic (the same inputs can produce different outputs on different runs), AI decisions are difficult to audit (the reasoning behind a specific action may not be traceable), and AI cannot be held legally accountable for regulatory compliance. The 3-Layer Rule allocates tasks to the component that handles them most reliably, not to the most sophisticated component available.
3. What is the difference between AI perception and AI reasoning in agentic systems?
AI perception means using AI to understand and structure unstructured input: reading a scanned document, classifying an image, extracting data from a variable-format file. AI reasoning means using AI to make decisions about what action to take next. The 3-Layer Rule uses AI only for perception. All reasoning and decision-making is handled by deterministic logic (Layer 2) or human judgment (Layer 3).
4. Why is deterministic code better than AI for portal interactions?
Deterministic code produces the same output for the same input every time. When a portal interaction executes correctly, it is because the input data was correct. When it fails, the failure is specific and diagnosable. AI portal interaction introduces non-determinism: the AI might occasionally click the wrong element, enter a value in the wrong field, or interpret an ambiguous interface element incorrectly. For financial and healthcare portals where wrong entries have regulatory and financial consequences, this non-determinism is unacceptable.
5. What is the review gate in the 3-Layer Rule?
The review gate is the mandatory human checkpoint between Layer 2 preparation and Layer 2 execution. Before the automation begins processing a batch of work, it presents a structured summary to the human operator: which items are ready, which are skipped and why, which have warnings. The operator reviews and explicitly approves. Execution does not begin until this approval is received. This gate is the primary compliance anchor and the mechanism by which human accountability is established.
6. How does the 3-Layer Rule handle exceptions?
Exceptions are identified at Layer 1 (AI cannot read the document reliably) or Layer 2 (the extracted data does not match the expected total, the document is missing, the portal field cannot be populated from the available data). Exceptions are surfaced to the human operator at the review gate with specific reasons. The operator decides: fix the underlying issue and reprocess, handle the exception manually, or defer to the next processing cycle. Exceptions are never silently ignored or automatically resolved.
7. Which industries benefit most from the 3-Layer Rule architecture?
Any industry where errors have regulatory or financial consequences benefits from this architecture: healthcare (medical billing, claims processing, clinical documentation), finance (invoice processing, GST compliance, payment authorization, audit preparation), government (portal submissions, scheme compliance, regulatory filings), legal (document processing, contract management, compliance monitoring), and retail (supplier compliance, customs documentation, tax filing). The common thread is that errors are expensive and actions must be traceable to accountable humans.
8. Can the 3-Layer Rule work for high-volume workflows with hundreds of items per batch?
Yes. The architecture is designed for high-volume workflows. The AI perception layer processes all items in a batch. The deterministic logic layer executes on all approved items in sequence. The human review gate is designed to be fast: reviewing a manifest of 50 to 100 items takes 5 to 15 minutes, not proportional to item count. Volume is handled by Layers 1 and 2; the human only sees the exceptions and the summary.
9. How does the 3-Layer Rule produce an audit trail?
Every action in Layer 2 is logged with the source data that triggered it, the specific action taken, the value entered or computed, and the timestamp. The Layer 1 extraction results are stored alongside the source document. The Layer 3 approval is logged with the operator identifier and timestamp. The complete audit trail for any item in a batch traces from the source document through Layer 1 extraction to Layer 2 actions to Layer 3 approval. A regulator asking about any specific item can receive a complete trace in minutes.
10. How is the 3-Layer Rule different from RPA (Robotic Process Automation)?
RPA handles only Layer 2 (deterministic automation of interface interactions) and lacks Layer 1 (it cannot read unstructured documents) and Layer 3 design (it has no structured human review gate). Pure AI agents handle Layer 1 well but tend to use AI throughout Layer 2 where determinism would be better, and often lack Layer 3 oversight entirely. The 3-Layer Rule is the combination that produces reliable, compliant, production-grade agents: AI for perception, deterministic code for execution, human judgment for irreversible decisions.
Related: Why Hospital Claims Processing Is Still Broken in 2026 | Human-in-the-Loop AI: Why Full Automation Is the Wrong Goal | Why Most AI Agents Fail in Production
Agentic AI Strategy
Raj Gupta

IPL, ISL, PKL: How Indian Sports Leagues Can Use AI Agents for Digital Operations in 2026
The Short Answer
Indian sports leagues (IPL, ISL, PKL, PBL, and others) are among the highest-engagement sports properties in the world, with IPL regularly generating over 600 million viewers per season. Yet the digital operations infrastructure behind most Indian sports leagues, including fan data activation, sponsorship tracking, and operational automation, remains significantly behind the fan engagement potential. AI agents in 2026 offer Indian sports leagues specific capabilities in fan communication personalization, match-day operations automation, sponsorship compliance tracking, and content distribution at scale. According to BCCI's digital operations data, IPL digital engagement generates over 2 billion interactions per season across social and digital channels. Converting even a fraction of this engagement into data-driven relationships with measurable commercial outcomes is the primary AI opportunity for Indian sports leagues.
The Indian Sports League Opportunity
Indian sports leagues have three characteristics that make AI agents particularly valuable:
Massive fan bases with low data activation. IPL franchises have millions of fans but most of those fans are identified only by demographic data at best. Behavioral data (who bought tickets, who watches on TV vs attends, who buys merchandise, who engages with digital content) is under-utilized for personalized communication. AI fan data activation connects the fan's behavioral signals to targeted, relevant communication.
Short, intense seasons. IPL's 10-week season, ISL's 5-month season, and PKL's compressed schedule create high-intensity operational periods where every match matters commercially. The concentration of high-stakes moments in a short window means AI operational automation delivers compounding value: a capability that works for every match in an 8-match home schedule delivers 8x the value of a one-time deployment.
WhatsApp as the dominant fan channel. Indian sports fans are on WhatsApp at a penetration that no other country matches. WhatsApp Business API-connected AI agents for fan communication, match-day operations, and sponsor reporting match the actual behavior of the fan base rather than requiring them to adopt new channels.
AI Use Cases by Indian Sports League Type
IPL Franchises
Fan data activation: IPL franchises have the largest and most commercially developed fan bases in Indian sports. AI personalization for pre-match ticket campaigns, merchandise offers, and broadcast promotion is directly ROI-positive. A targeted WhatsApp campaign to fans who attended the last home match but have not yet bought tickets for the upcoming match consistently outperforms broadcast messaging.
Sponsorship operations: IPL franchise sponsorship portfolios are among the most complex in Indian sports, with 15 to 30 concurrent sponsors at different tiers. AI-powered sponsorship delivery tracking and automated sponsor reports reduce the manual operations burden and improve renewal documentation.
Match-day content: IPL T20 matches generate dozens of significant moments per match. AI moment-triggered content drafting for social media increases the volume and timeliness of content the digital team can publish without increasing headcount.
ISL Franchises
Regional fan engagement: ISL franchises have strong regional identities (Bengaluru FC for Karnataka, Kerala Blasters for Kerala, Mohun Bagan and East Bengal for West Bengal). AI fan communication that uses regional language content and references regional identity consistently outperforms English-only communication.
Season-long fan retention: ISL's longer season (October to April) creates fan retention challenges that single-season leagues do not face. AI agents that identify engagement drop-off among fans who attended early-season matches and re-engage them before later matches address a specific ISL commercial challenge.
Match-day operations: ISL stadium capacity and matchday logistics benefit from AI-powered customer service agents handling parking, transport, food, and accessibility queries via WhatsApp, reducing the load on match-day staff.
PKL Teams
Emerging fan base development: PKL (Pro Kabaddi League) has built a significant fan base since its launch, but the fan data infrastructure is less developed than cricket. AI agents that help PKL teams build fan data profiles from ticket purchases, merchandise sales, and digital engagement create the foundation for personalized communication.
Tier-2 city engagement: PKL has significant fan bases in tier-2 and tier-3 cities where digital engagement patterns differ from metro fans. AI communication optimized for Hindi and regional language WhatsApp engagement is particularly valuable for PKL teams serving non-metro fan bases.
Cost-efficient operations: PKL teams operate with smaller marketing budgets than IPL or ISL. AI automation that reduces operational headcount requirements for fan communication, sponsorship tracking, and content distribution is proportionally more valuable for budget-constrained sports organizations.
Indian Sports League AI Opportunity by Function
Function | IPL | ISL | PKL | Key AI Capability |
|---|---|---|---|---|
Fan data activation | Very high value | High value | Medium value | WhatsApp personalization |
Sponsorship tracking | Very high (30 sponsors) | High (15-20 sponsors) | Medium (8-12 sponsors) | Digital fulfillment monitoring |
Match-day operations | High (large stadiums) | High (regional engagement) | Medium | WhatsApp customer service |
Content automation | Very high (T20 moments) | High | Medium | Moment-triggered drafting |
Regional language | Medium (national audience) | Very high (regional identity) | Very high (tier-2 cities) | Hindi + regional content |
Source: BCCI digital data, ISL commercial reports, PKL league data, Dualite sports analysis, 2026
What Indian Sports Leagues Should Build First
For most Indian sports leagues, the highest-ROI first AI deployment is WhatsApp-based fan communication personalization. The reason: the fan data already exists (ticket purchasers, merchandise buyers), the channel already works (fans use WhatsApp with their teams informally), and the commercial impact is directly measurable (ticket conversion on targeted offers vs broadcast offers).
The second deployment, for leagues with significant sponsorship portfolios, is digital sponsorship fulfillment tracking. For IPL franchises managing 30 sponsors across digital channels, the manual tracking burden is significant and the renewal case from better documentation is commercially valuable.
Dualite builds AI agents for Indian sports leagues with WhatsApp Business API integration, multilingual fan communication, sponsorship fulfillment tracking, and Indian sports calendar awareness as core capabilities.
Conclusion
Indian sports leagues in 2026 have fan bases and commercial opportunities that are not matched by their digital operations infrastructure. AI agents offer a path to activate the fan data that leagues already have, automate the operational workflows that consume team time, and deliver the personalized fan communications that convert engagement into commercial outcomes. The leagues that build this infrastructure during the current period will have a durable competitive advantage in fan monetization and sponsor retention that leagues investing later will struggle to replicate.
Frequently Asked Questions
1. What are the best AI use cases for IPL franchises specifically?
For IPL franchises, the highest-value AI use cases are: WhatsApp-based personalized fan communication for pre-match ticket and merchandise campaigns, AI-powered sponsorship delivery tracking and reporting for multi-sponsor portfolios, and moment-triggered social content drafting during T20 matches. IPL's large fan bases, complex sponsorship portfolios, and high match-moment frequency make all three high-ROI deployments.
2. How can ISL (Indian Super League) franchises use AI for fan engagement?
ISL franchises benefit most from regional language fan communication (using Hindi or the regional language of the franchise's home market), season-long fan retention campaigns (re-engaging fans who attended early-season matches but show engagement drop-off), and match-day WhatsApp customer service. ISL's regional identity and longer season create specific retention challenges that AI personalization directly addresses.
3. What is the WhatsApp AI opportunity for Indian sports leagues?
WhatsApp is the dominant digital communication channel for Indian sports fans. AI agents connected via the WhatsApp Business API can handle match-day fan queries (tickets, parking, schedules), send personalized pre-match campaigns to segmented fan groups, deliver automated match reminders and result notifications, and process merchandise and ticket inquiries. The channel reach in India is unmatched and the fan response rates are significantly higher than email.
4. How should PKL teams approach AI with limited marketing budgets?
For PKL teams with budget constraints, start with the highest-ROI, lowest-cost AI deployment: WhatsApp-based personalized fan communication using existing ticket purchaser data. The cost is primarily the WhatsApp Business API messaging fee and the agent development cost, both manageable for a PKL franchise. The ROI from ticket conversion improvement on targeted campaigns versus broadcast campaigns is typically positive within the first season.
5. What fan data do Indian sports leagues typically have available for AI activation?
Most organized Indian sports leagues have ticket purchaser data (contact information, seat category, match history), merchandise purchaser data (products bought, amounts spent), and some form of digital engagement data (email opens, app logins, social engagement if tracked). This data is sufficient to build meaningful fan segments for personalized communication. The gap for most leagues is not data availability but data activation: using the data for personalized communication rather than broadcast.
6. How does AI help smaller Indian sports leagues compete with IPL's resources?
Smaller leagues (ISL, PKL, PBL, ISH) cannot match IPL's marketing budgets. AI automation reduces the per-fan communication cost by automating execution, making personalized fan communication at scale feasible with smaller teams. A PKL franchise with a marketing team of 5 people can execute personalized WhatsApp campaigns to 100,000 fans with AI assistance; without AI, the same team could only manage broadcast communication.
7. What is the biggest digital operations gap for most Indian sports leagues?
Sponsor operations is the most systematically under-developed function. Most Indian sports leagues have significant sponsorship revenue but manage sponsorship delivery tracking, reporting, and renewal preparation manually. The ROI from AI-powered sponsorship operations (comprehensive delivery documentation, automated reports, data-driven renewal preparation) is high and the competitive risk from not doing it (losing renewals due to poor documentation) is real.
8. How does regional language AI work for sports fan communication?
AI content generation tools produce first-draft WhatsApp messages, email content, and social captions in Hindi and major Indian regional languages. For a franchise like Kerala Blasters, Malayalam-language fan communication significantly outperforms English. The AI generates the first draft; a team member who speaks the language reviews and refines before sending. The AI handles the scale; the human provides the linguistic quality check.
9. What match data feeds do Indian sports leagues have access to for AI content generation?
IPL and BCCI-controlled cricket has the most developed real-time match data infrastructure. ISL has reliable match data through FSDL partnerships. PKL has match data through Star Sports and PKL's own digital infrastructure. The quality and granularity of real-time match data varies significantly. AI content generation from match data requires access to real-time event feeds (ball-by-ball for cricket, goal/card events for football, raid points for kabaddi).
10. How long does it take to implement AI fan engagement for an Indian sports franchise?
For a WhatsApp-based personalized fan communication system covering the top use cases (pre-match campaigns, match reminders, match-day customer service): 6 to 10 weeks including WhatsApp Business API approval (1 to 2 weeks), fan data integration, campaign flow design, and testing. For a sponsorship tracking system: 4 to 8 weeks. Both can run in parallel. A franchise could have both systems operational before the start of a new season with a 3-month implementation window.
Related: How Sports Teams Are Using AI for Fan Engagement in 2026 | AI Agents for Sports Sponsorship Management | How AI Is Changing Sports Marketing Campaigns
Sports Marketing AI
Raj Gupta
The Sports Data Problem: Why AI Agents Are Better at Fan Analytics Than Human Analysts
The Short Answer
Sports fan analytics is a data problem that human analysts cannot solve at scale. An IPL franchise with 5 million fans generates tens of millions of behavioral data points per season across ticket purchases, merchandise, digital content engagement, app behavior, and social interaction. Human analysts cannot process this volume at the frequency needed for real-time campaign decisions. AI agents that continuously analyze fan behavioral data, identify engagement patterns, and surface actionable insights transform fan analytics from a periodic reporting exercise into a continuous operational capability. According to McKinsey's 2026 Sports Business report, sports organizations that deploy AI for fan analytics increase their fan database revenue yield by an average of 23% by identifying high-value fan segments and targeting them with relevant commercial offers.
The Fan Data Problem in Sports
Sports organizations accumulate fan data from multiple sources that are rarely connected:
Ticketing data: Who bought tickets, which matches, which seat categories, how far in advance, at what price points, whether they attended as individuals or groups.
Merchandise data: Who bought, what products, around which match or event, at which price points.
Digital engagement data: Who opened emails, clicked links, watched digital content, engaged with social posts, used the app.
Streaming data: For leagues with OTT platforms, who streamed which matches, for how long, in which markets.
Stadium operations data: Which fans used which gates, which food outlets, which merchandise stores.
Each of these data streams is typically managed in a separate system by a separate team. The commercial value of the data comes from connecting them: identifying that a fan who bought a jersey in March is 3x more likely to buy a premium ticket for a rivalry match than a fan who has only attended on free or discounted tickets. Human analysts can produce this insight for a sample. AI agents can produce it for every fan, continuously.
What AI Fan Analytics Actually Enables
Automated Fan Segmentation
Instead of manually defining fan segments (which requires analyst time and becomes outdated), AI continuously clusters fans based on behavioral similarity. The segments it identifies reflect actual fan behavior rather than demographic assumptions.
Common behavioral segments that AI analytics identifies in sports fan databases:
High-value attenders: Attend most home matches, buy premium categories, renew early, low price sensitivity
Merchandise-first fans: High merchandise purchase frequency, lower ticket purchase frequency, engage primarily through product
Digital-only fans: High content engagement, low ticket purchase, typically outside the attending geography
Lapsed high-value fans: Historical high engagement, recent drop-off in engagement and purchase activity
Growth fans: Recent first purchase or first attendance, early signals of growing engagement
Each segment gets different communication strategies and commercial offers. AI identifies which fans belong in which segment and updates the classification continuously as fan behavior changes.
Churn Prediction
A season ticket holder who does not renew represents significant lost revenue. Predicting which fans are at risk of churning early enough to intervene is one of the highest-value fan analytics applications.
AI churn prediction models use behavioral signals to identify fans who are trending toward disengagement: reduced email open rates, fewer match attendances than previous seasons, merchandise purchase drop-off, decreased digital content engagement. Fans flagged as churn risk receive targeted re-engagement communications before they make an explicit non-renewal decision.
For Indian cricket franchises with season ticket holders, churn prediction that enables proactive re-engagement typically produces 15 to 25% improvement in retention versus reactive renewal campaigns.
Propensity Scoring for Commercial Offers
Not all fans have equal propensity to purchase for every commercial offer. AI propensity scoring assigns each fan a likelihood score for each commercial action: ticket purchase for an upcoming match, merchandise purchase of a specific product category, premium ticket upgrade, hospitality package purchase.
This scoring enables targeted commercial campaigns that send the most relevant offer to the fans most likely to respond. A hospitality package offer to fans with high hospitality propensity scores converts at 4 to 6 times the rate of the same offer sent to the full fan database.
Real-Time Match-Day Insights
For organizations with stadium WiFi, app, and point-of-sale data, AI agents provide real-time match-day insights: which merchandise is selling fastest (triggering restocking alerts), which food outlets are experiencing queues (triggering operational adjustments), which entry gates are congested (triggering steward deployment). These operational insights are only possible with real-time data processing that human analysts cannot provide at the required frequency.
Fan Analytics Maturity Model
Maturity Level | Capability | Tools | Impact |
|---|---|---|---|
Level 1: Reporting | Historical data compiled periodically | Manual Excel/BI tools | Understand what happened |
Level 2: Segmentation | Fan groups defined by behavior | BI tools with some automation | Target campaigns by segment |
Level 3: Prediction | Churn risk and purchase propensity | ML models, basic AI | Proactive re-engagement, targeted offers |
Level 4: Real-Time | Live behavioral signals driving decisions | AI agents, real-time data pipelines | Match-day optimization, instant personalization |
Source: McKinsey 2026 Sports Business Report, Dualite sports analytics framework
Most Indian sports organizations are at Level 1 or Level 2. The organizations that will lead in fan monetization are building toward Level 3 and Level 4.
The India-Specific Fan Analytics Context
Indian sports fan analytics has specific characteristics:
WhatsApp as primary engagement channel. Email-open-rate-based engagement models miss the primary fan engagement channel in India. Fan analytics for Indian sports must incorporate WhatsApp engagement data.
Regional language signal. Which language a fan prefers for communication is a behavioral signal that predicts engagement with regional-language content and regional identity-based campaigns. AI fan analytics that incorporates language preference data produces better segment definitions than language-agnostic models.
Tier classification as a fan behavior signal. Fans in tier-1 metro cities, tier-2 cities, and rural areas have different attendance patterns, digital engagement behaviors, and commercial response rates. AI segmentation that incorporates geography with behavioral data produces more commercially actionable segments.
Dualite builds fan analytics AI agents for Indian sports organizations with WhatsApp engagement integration, regional language segmentation, and Indian sports calendar-aware behavioral modeling.
Conclusion
Fan analytics in sports is genuinely a problem that AI solves better than human analysts, not because AI is smarter but because the data volume, the required frequency, and the number of fans requiring individual assessment exceed what human analysis can deliver at the speed commercial decisions require. Sports organizations that build AI fan analytics capability will identify revenue opportunities that manual reporting misses and execute on those opportunities faster than organizations relying on periodic analyst reports.
Frequently Asked Questions
1. What is sports fan analytics and why is it a data problem?
Sports fan analytics is the analysis of fan behavioral data to understand fan engagement, identify commercial opportunities, and predict future fan behavior. It is a data problem because modern sports organizations accumulate fan data at a volume and variety that exceeds manual analysis capacity. An IPL franchise with millions of fans generating behavioral signals across ticketing, merchandise, digital, and app platforms requires AI to process and act on this data at the required speed and scale.
2. What is AI churn prediction in sports fan analytics?
AI churn prediction identifies fans who are trending toward disengagement before they make an explicit non-renewal decision. The model uses behavioral signals (reduced email engagement, fewer match attendances than previous season, merchandise purchase drop-off) to score each fan's churn risk. High-risk fans receive targeted re-engagement communications while there is still time to reverse the trend. Organizations that deploy churn prediction before renewal season consistently outperform those that rely on reactive renewal campaigns.
3. What is fan propensity scoring and how does it improve campaign ROI?
Fan propensity scoring assigns each fan a likelihood score for each commercial action: ticket purchase, merchandise purchase, hospitality upgrade, premium package. Instead of sending all commercial offers to all fans, AI-powered campaigns match offers to fans with high propensity for that specific offer. The result is higher conversion rates (because the offer is relevant), lower communication frequency (because fans receive only relevant offers), and higher overall campaign ROI.
4. What data does AI fan analytics require?
Minimum useful data: ticket purchase history (which matches, seat categories, prices), merchandise purchase history, and email/WhatsApp engagement data. This is enough to build basic segmentation and propensity models. Enhanced analytics adds app behavioral data, social engagement data, streaming data (for leagues with OTT), and stadium WiFi/app data for match-day insights. Most organized Indian sports organizations have the minimum data; the gap is in connecting and activating it.
5. How does AI fan segmentation differ from traditional demographic segmentation?
Demographic segmentation groups fans by age, gender, location, and income. AI behavioral segmentation groups fans by what they actually do: when they buy tickets, what they buy merchandise for, how they engage with digital content, what events trigger a purchase. Behavioral segments are more predictive of commercial response than demographic segments because they reflect actual fan relationship patterns with the franchise rather than demographic assumptions about group behavior.
6. What are the highest-value fan analytics use cases for Indian cricket franchises?
In priority order: churn prediction for season ticket holders (highest revenue risk to protect), merchandise purchase propensity for targeted offers (highest conversion improvement opportunity), digital engagement-to-attendance conversion (identifying digital fans who could become ticket buyers), and lapsed high-value fan re-engagement (identifying former high-spenders who have dropped off). Each of these has clear, measurable commercial impact.
7. Can AI fan analytics work for sports organizations with smaller fan databases?
Yes, but with lower model confidence. AI analytics produces more reliable insights with larger datasets. For organizations with fewer than 10,000 identified fans, simpler segmentation approaches (purchase frequency, recency, and value scoring) are more appropriate than complex behavioral clustering models. As the fan database grows, the analytics sophistication can increase. Start with what the data supports.
8. How does WhatsApp engagement data improve fan analytics for Indian sports?
WhatsApp is the primary engagement channel for Indian sports fans. A fan analytics model that uses only email engagement data misses the signal from the most-used channel. Incorporating WhatsApp message open rates, link clicks, and response behavior significantly improves the accuracy of engagement scoring and churn prediction models for Indian fans. Organizations that integrate WhatsApp Business API data into their fan analytics have a more complete picture of fan engagement than those relying on email alone.
9. What privacy considerations apply to AI fan analytics in India?
The Digital Personal Data Protection Act (DPDPA) 2023, effective from 2024 onwards, requires consent for collection and processing of personal data in India. Fan analytics requires valid consent for using ticket purchase, merchandise, and digital engagement data. Most organized sports organizations collect consent through their ticketing terms and app permissions. The analytics data should be used only for the purposes consented to and should not be shared with third parties without additional consent.
10. How long does it take to build a useful AI fan analytics capability for an Indian sports franchise?
For a basic segmentation and propensity scoring model using existing ticketing and merchandise data: 6 to 10 weeks. This includes data audit and cleaning (typically the longest phase for organizations with data in multiple systems), model development, validation against historical commercial outcomes, and integration with the campaign execution system. The ROI from the first targeted campaign using propensity scoring typically covers the implementation cost.
Related: How Sports Teams Are Using AI for Fan Engagement in 2026 | IPL, ISL, PKL: How Indian Sports Leagues Can Use AI Agents | The 3-Layer Rule for AI Agents in Regulated Industries
Sports Marketing AI
Raj Gupta
The 3-Layer Rule for AI Agents in Regulated Industries: Perception, Logic, Human Judgment
The Short Answer
The 3-Layer Rule for AI agents in regulated industries divides every automated workflow into three distinct layers, each handled by a different type of system. Layer 1 is Perception: AI handles tasks involving unstructured input (reading scanned documents, classifying images, extracting data from variable-format files). Layer 2 is Logic: deterministic, auditable code handles all calculations, matching, routing, and portal interactions. Layer 3 is Human Judgment: a human reviews prepared work and makes every irreversible decision. This architecture produces AI agents that are trustworthy, auditable, and adoptable in the healthcare, finance, legal, and government contexts where errors are expensive and accountability is non-negotiable. According to Gartner's 2026 AI implementation report, 67% of AI agent failures in regulated industries are attributable to violating this separation: using AI where deterministic logic would be more reliable, or attempting full automation where human judgment is required.
Why Regulated Industries Break Generic AI Agents
The AI agent frameworks built for consumer applications and general software development do not work in regulated industries without significant redesign. The reason is a fundamental mismatch between what these frameworks optimize for and what regulated environments require.
General AI agent frameworks optimize for flexibility and goal completion. An agent given a goal will attempt to achieve it through whatever means its reasoning capabilities allow. This is appropriate for tasks where the path to the goal is variable and errors are low-cost (drafting an email, summarizing a document, generating code).
Regulated environments have different requirements:
Errors are expensive and sometimes irreversible. A claim submitted with incorrect billing codes costs days of payment delay and requires rework. A financial transaction executed incorrectly may not be reversible. A compliance filing with wrong data triggers regulatory attention.
Every action must be traceable. A regulator asking "why was this value entered in this field on this date" expects a specific, documented answer. "The AI decided it" is not an answer. The source data, the rule applied, and the human who approved the action must all be identifiable.
Accountability must be assignable to a human. Regulated industries have legal accountability frameworks. Someone is responsible for a hospital claim, a financial filing, or a legal document. That person cannot delegate the accountability to an AI system.
The 3-Layer Rule is the architectural response to these constraints.
Layer 1: AI for Perception
AI is genuinely better than deterministic rules at one specific class of task: understanding variable, unstructured inputs.
A scanned hospital bill is an unstructured image. The billing codes, quantities, and prices might be in a table, or in a list, or in a hybrid format. The handwriting might be clear or faint. The layout might match a template or vary by department. Rule-based extraction code cannot handle this variability reliably. A vision AI model can.
A vendor invoice from a new supplier has an unknown format. The supplier name, amount, line items, and tax details might be anywhere on the page. Template-based parsing fails for the first invoice from any new vendor. AI extraction succeeds.
A customer complaint message might be written formally or informally, clearly or ambiguously. A keyword-based classifier will miss most complaints. An AI language model classifies them correctly.
Layer 1 design principles:
AI in Layer 1 produces structured output, not decisions. The vision model reads the bill and returns a JSON object with extracted values. The language model classifies the message and returns a category. What happens next is determined by Layer 2, not by further AI reasoning.
Layer 1 output must include confidence scores. When the AI is uncertain about an extracted value, it says so. Low-confidence outputs are flagged for human review rather than passed to Layer 2.
Layer 1 does not make consequential decisions. It perceives and structures. Decision-making belongs to Layer 2 and Layer 3.
Layer 2: Deterministic Logic for Execution
Once Layer 1 has produced structured data, every subsequent action should be deterministic. The same inputs must always produce the same outputs. Every action must be logged with its source and reasoning.
This is the layer most AI agent builders violate. Having used AI to extract data from a document, they continue using AI for the matching, calculation, and portal interaction steps where deterministic code would be more reliable.
The specific actions that belong in Layer 2:
Matching: Does this invoice match a purchase order? Does this claim ID correspond to a patient record? Does this document filename correspond to a category? These are rule-based lookups with configurable tolerance thresholds. Deterministic.
Calculation: What is the sum of all billing code amounts? Does it match the expected total? What is the TDS amount on this vendor payment? What is the early payment discount value? These are arithmetic operations. Deterministic.
Portal interaction: Navigate to this URL. Click this element. Enter this value in this field. Read back the field to verify. These actions are performed the same way every time. Deterministic.
Verification: Does the field value entered match the source manifest? Is every required document present in the upload table? Do the fields across all portal tabs match the expected values? These are comparison operations. Deterministic.
Layer 2 design principles:
Every Layer 2 action is logged with: the input data, the action taken, the output produced, and the timestamp. This log is the audit trail.
Layer 2 fails loudly and specifically. When a verification check fails (the amount does not match, the document is missing), Layer 2 stops the process and reports the specific failure with the specific values. It does not attempt to continue or make a judgment about whether to proceed.
Layer 2 never takes irreversible actions autonomously. Portal submissions, payment authorizations, and filing confirmations are handed to Layer 3.
Layer 3: Human Judgment for Irreversible Decisions
Layer 3 is not a failure of the AI system. It is the correct allocation of human accountability to decisions that require it.
The actions that belong in Layer 3:
Final submission. Submitting a hospital claim, filing a tax return, authorizing a payment, confirming a contract. These actions are difficult or impossible to reverse and carry financial and regulatory consequences.
Exception resolution. When Layer 2 identifies a problem (amount mismatch, missing document, unrecognized supplier), a human makes the decision: fix the underlying data and reprocess, handle the exception manually, or skip this item entirely.
Review gate approval. Before Layer 2 begins executing against a batch of work, a human reviews the prepared manifest: which items are ready, which are skipped and why, which have warnings. Explicit approval is required. Silence is not approval.
Authentication. Login credentials for regulated government portals and financial systems belong with the human operator. Credential management is a security and compliance boundary.
Layer 3 design principles:
The review gate shows the human exactly what the system prepared. Ready items, skipped items with reasons, warnings on borderline items. The human can act on this information in minutes.
Layer 3 is designed for speed. The goal is to minimize the time the human spends on Layer 3 without eliminating it. A well-designed review gate takes 5 to 15 minutes for a batch that would have required a full working day without automation.
Layer 3 is the compliance anchor. When a regulator asks who authorized a portal submission or payment, the answer traces to the human who approved at Layer 3.
Why This Architecture Succeeds Where Others Fail
Failure Mode | Full Automation | AI Throughout | 3-Layer Rule |
|---|---|---|---|
Scanned document extraction error | Submits wrong data | May catch it | Caught at Layer 1 verification |
Calculation error | Submits wrong total | Possible | Impossible (Layer 2 is deterministic) |
Portal interface change | Silently fails or wrong entries | May recover | Fails loudly, specific error |
Compliance audit | Cannot trace decision | Partially traceable | Full audit trail, every step |
Irreversible wrong submission | Happens | Risk exists | Structurally prevented at Layer 3 |
Operator illness | Work stops | Work stops | Work continues (AI handles execution) |
Source: Dualite engineering design principles, 2026
Dualite applies the 3-Layer Rule to every AI agent it builds across healthcare, finance, retail, and sports operations. The architecture is not optional for regulated domains. It is the correct design.
Conclusion
The 3-Layer Rule is not a restriction on what AI can do. It is the correct allocation of AI, deterministic logic, and human judgment to the tasks each handles best. AI perceives because it is genuinely better at understanding variable, unstructured input than rule-based parsers. Deterministic logic executes because predictable, auditable behavior is more valuable than flexible reasoning for defined actions. Human judgment decides because accountability in regulated domains requires a human decision-maker for irreversible actions. Organizations that implement this architecture build AI agents that work in production, survive regulatory scrutiny, and earn operator trust. Organizations that skip it build agents that work in demos and fail in production.
Frequently Asked Questions
1. What is the 3-Layer Rule for AI agents in regulated industries?
The 3-Layer Rule divides AI agent architecture into three layers: Layer 1 (Perception, where AI handles unstructured input extraction), Layer 2 (Logic, where deterministic code handles all calculations, matching, and portal interactions), and Layer 3 (Human Judgment, where a human reviews prepared work and makes irreversible decisions). This architecture produces agents that are reliable, auditable, and compliant in regulated environments.
2. Why should not AI handle everything end to end in an automated workflow?
Full AI end-to-end automation fails in regulated industries because AI is non-deterministic (the same inputs can produce different outputs on different runs), AI decisions are difficult to audit (the reasoning behind a specific action may not be traceable), and AI cannot be held legally accountable for regulatory compliance. The 3-Layer Rule allocates tasks to the component that handles them most reliably, not to the most sophisticated component available.
3. What is the difference between AI perception and AI reasoning in agentic systems?
AI perception means using AI to understand and structure unstructured input: reading a scanned document, classifying an image, extracting data from a variable-format file. AI reasoning means using AI to make decisions about what action to take next. The 3-Layer Rule uses AI only for perception. All reasoning and decision-making is handled by deterministic logic (Layer 2) or human judgment (Layer 3).
4. Why is deterministic code better than AI for portal interactions?
Deterministic code produces the same output for the same input every time. When a portal interaction executes correctly, it is because the input data was correct. When it fails, the failure is specific and diagnosable. AI portal interaction introduces non-determinism: the AI might occasionally click the wrong element, enter a value in the wrong field, or interpret an ambiguous interface element incorrectly. For financial and healthcare portals where wrong entries have regulatory and financial consequences, this non-determinism is unacceptable.
5. What is the review gate in the 3-Layer Rule?
The review gate is the mandatory human checkpoint between Layer 2 preparation and Layer 2 execution. Before the automation begins processing a batch of work, it presents a structured summary to the human operator: which items are ready, which are skipped and why, which have warnings. The operator reviews and explicitly approves. Execution does not begin until this approval is received. This gate is the primary compliance anchor and the mechanism by which human accountability is established.
6. How does the 3-Layer Rule handle exceptions?
Exceptions are identified at Layer 1 (AI cannot read the document reliably) or Layer 2 (the extracted data does not match the expected total, the document is missing, the portal field cannot be populated from the available data). Exceptions are surfaced to the human operator at the review gate with specific reasons. The operator decides: fix the underlying issue and reprocess, handle the exception manually, or defer to the next processing cycle. Exceptions are never silently ignored or automatically resolved.
7. Which industries benefit most from the 3-Layer Rule architecture?
Any industry where errors have regulatory or financial consequences benefits from this architecture: healthcare (medical billing, claims processing, clinical documentation), finance (invoice processing, GST compliance, payment authorization, audit preparation), government (portal submissions, scheme compliance, regulatory filings), legal (document processing, contract management, compliance monitoring), and retail (supplier compliance, customs documentation, tax filing). The common thread is that errors are expensive and actions must be traceable to accountable humans.
8. Can the 3-Layer Rule work for high-volume workflows with hundreds of items per batch?
Yes. The architecture is designed for high-volume workflows. The AI perception layer processes all items in a batch. The deterministic logic layer executes on all approved items in sequence. The human review gate is designed to be fast: reviewing a manifest of 50 to 100 items takes 5 to 15 minutes, not proportional to item count. Volume is handled by Layers 1 and 2; the human only sees the exceptions and the summary.
9. How does the 3-Layer Rule produce an audit trail?
Every action in Layer 2 is logged with the source data that triggered it, the specific action taken, the value entered or computed, and the timestamp. The Layer 1 extraction results are stored alongside the source document. The Layer 3 approval is logged with the operator identifier and timestamp. The complete audit trail for any item in a batch traces from the source document through Layer 1 extraction to Layer 2 actions to Layer 3 approval. A regulator asking about any specific item can receive a complete trace in minutes.
10. How is the 3-Layer Rule different from RPA (Robotic Process Automation)?
RPA handles only Layer 2 (deterministic automation of interface interactions) and lacks Layer 1 (it cannot read unstructured documents) and Layer 3 design (it has no structured human review gate). Pure AI agents handle Layer 1 well but tend to use AI throughout Layer 2 where determinism would be better, and often lack Layer 3 oversight entirely. The 3-Layer Rule is the combination that produces reliable, compliant, production-grade agents: AI for perception, deterministic code for execution, human judgment for irreversible decisions.
Related: Why Hospital Claims Processing Is Still Broken in 2026 | Human-in-the-Loop AI: Why Full Automation Is the Wrong Goal | Why Most AI Agents Fail in Production
Agentic AI Strategy
Raj Gupta
IPL, ISL, PKL: How Indian Sports Leagues Can Use AI Agents for Digital Operations in 2026
The Short Answer
Indian sports leagues (IPL, ISL, PKL, PBL, and others) are among the highest-engagement sports properties in the world, with IPL regularly generating over 600 million viewers per season. Yet the digital operations infrastructure behind most Indian sports leagues, including fan data activation, sponsorship tracking, and operational automation, remains significantly behind the fan engagement potential. AI agents in 2026 offer Indian sports leagues specific capabilities in fan communication personalization, match-day operations automation, sponsorship compliance tracking, and content distribution at scale. According to BCCI's digital operations data, IPL digital engagement generates over 2 billion interactions per season across social and digital channels. Converting even a fraction of this engagement into data-driven relationships with measurable commercial outcomes is the primary AI opportunity for Indian sports leagues.
The Indian Sports League Opportunity
Indian sports leagues have three characteristics that make AI agents particularly valuable:
Massive fan bases with low data activation. IPL franchises have millions of fans but most of those fans are identified only by demographic data at best. Behavioral data (who bought tickets, who watches on TV vs attends, who buys merchandise, who engages with digital content) is under-utilized for personalized communication. AI fan data activation connects the fan's behavioral signals to targeted, relevant communication.
Short, intense seasons. IPL's 10-week season, ISL's 5-month season, and PKL's compressed schedule create high-intensity operational periods where every match matters commercially. The concentration of high-stakes moments in a short window means AI operational automation delivers compounding value: a capability that works for every match in an 8-match home schedule delivers 8x the value of a one-time deployment.
WhatsApp as the dominant fan channel. Indian sports fans are on WhatsApp at a penetration that no other country matches. WhatsApp Business API-connected AI agents for fan communication, match-day operations, and sponsor reporting match the actual behavior of the fan base rather than requiring them to adopt new channels.
AI Use Cases by Indian Sports League Type
IPL Franchises
Fan data activation: IPL franchises have the largest and most commercially developed fan bases in Indian sports. AI personalization for pre-match ticket campaigns, merchandise offers, and broadcast promotion is directly ROI-positive. A targeted WhatsApp campaign to fans who attended the last home match but have not yet bought tickets for the upcoming match consistently outperforms broadcast messaging.
Sponsorship operations: IPL franchise sponsorship portfolios are among the most complex in Indian sports, with 15 to 30 concurrent sponsors at different tiers. AI-powered sponsorship delivery tracking and automated sponsor reports reduce the manual operations burden and improve renewal documentation.
Match-day content: IPL T20 matches generate dozens of significant moments per match. AI moment-triggered content drafting for social media increases the volume and timeliness of content the digital team can publish without increasing headcount.
ISL Franchises
Regional fan engagement: ISL franchises have strong regional identities (Bengaluru FC for Karnataka, Kerala Blasters for Kerala, Mohun Bagan and East Bengal for West Bengal). AI fan communication that uses regional language content and references regional identity consistently outperforms English-only communication.
Season-long fan retention: ISL's longer season (October to April) creates fan retention challenges that single-season leagues do not face. AI agents that identify engagement drop-off among fans who attended early-season matches and re-engage them before later matches address a specific ISL commercial challenge.
Match-day operations: ISL stadium capacity and matchday logistics benefit from AI-powered customer service agents handling parking, transport, food, and accessibility queries via WhatsApp, reducing the load on match-day staff.
PKL Teams
Emerging fan base development: PKL (Pro Kabaddi League) has built a significant fan base since its launch, but the fan data infrastructure is less developed than cricket. AI agents that help PKL teams build fan data profiles from ticket purchases, merchandise sales, and digital engagement create the foundation for personalized communication.
Tier-2 city engagement: PKL has significant fan bases in tier-2 and tier-3 cities where digital engagement patterns differ from metro fans. AI communication optimized for Hindi and regional language WhatsApp engagement is particularly valuable for PKL teams serving non-metro fan bases.
Cost-efficient operations: PKL teams operate with smaller marketing budgets than IPL or ISL. AI automation that reduces operational headcount requirements for fan communication, sponsorship tracking, and content distribution is proportionally more valuable for budget-constrained sports organizations.
Indian Sports League AI Opportunity by Function
Function | IPL | ISL | PKL | Key AI Capability |
|---|---|---|---|---|
Fan data activation | Very high value | High value | Medium value | WhatsApp personalization |
Sponsorship tracking | Very high (30 sponsors) | High (15-20 sponsors) | Medium (8-12 sponsors) | Digital fulfillment monitoring |
Match-day operations | High (large stadiums) | High (regional engagement) | Medium | WhatsApp customer service |
Content automation | Very high (T20 moments) | High | Medium | Moment-triggered drafting |
Regional language | Medium (national audience) | Very high (regional identity) | Very high (tier-2 cities) | Hindi + regional content |
Source: BCCI digital data, ISL commercial reports, PKL league data, Dualite sports analysis, 2026
What Indian Sports Leagues Should Build First
For most Indian sports leagues, the highest-ROI first AI deployment is WhatsApp-based fan communication personalization. The reason: the fan data already exists (ticket purchasers, merchandise buyers), the channel already works (fans use WhatsApp with their teams informally), and the commercial impact is directly measurable (ticket conversion on targeted offers vs broadcast offers).
The second deployment, for leagues with significant sponsorship portfolios, is digital sponsorship fulfillment tracking. For IPL franchises managing 30 sponsors across digital channels, the manual tracking burden is significant and the renewal case from better documentation is commercially valuable.
Dualite builds AI agents for Indian sports leagues with WhatsApp Business API integration, multilingual fan communication, sponsorship fulfillment tracking, and Indian sports calendar awareness as core capabilities.
Conclusion
Indian sports leagues in 2026 have fan bases and commercial opportunities that are not matched by their digital operations infrastructure. AI agents offer a path to activate the fan data that leagues already have, automate the operational workflows that consume team time, and deliver the personalized fan communications that convert engagement into commercial outcomes. The leagues that build this infrastructure during the current period will have a durable competitive advantage in fan monetization and sponsor retention that leagues investing later will struggle to replicate.
Frequently Asked Questions
1. What are the best AI use cases for IPL franchises specifically?
For IPL franchises, the highest-value AI use cases are: WhatsApp-based personalized fan communication for pre-match ticket and merchandise campaigns, AI-powered sponsorship delivery tracking and reporting for multi-sponsor portfolios, and moment-triggered social content drafting during T20 matches. IPL's large fan bases, complex sponsorship portfolios, and high match-moment frequency make all three high-ROI deployments.
2. How can ISL (Indian Super League) franchises use AI for fan engagement?
ISL franchises benefit most from regional language fan communication (using Hindi or the regional language of the franchise's home market), season-long fan retention campaigns (re-engaging fans who attended early-season matches but show engagement drop-off), and match-day WhatsApp customer service. ISL's regional identity and longer season create specific retention challenges that AI personalization directly addresses.
3. What is the WhatsApp AI opportunity for Indian sports leagues?
WhatsApp is the dominant digital communication channel for Indian sports fans. AI agents connected via the WhatsApp Business API can handle match-day fan queries (tickets, parking, schedules), send personalized pre-match campaigns to segmented fan groups, deliver automated match reminders and result notifications, and process merchandise and ticket inquiries. The channel reach in India is unmatched and the fan response rates are significantly higher than email.
4. How should PKL teams approach AI with limited marketing budgets?
For PKL teams with budget constraints, start with the highest-ROI, lowest-cost AI deployment: WhatsApp-based personalized fan communication using existing ticket purchaser data. The cost is primarily the WhatsApp Business API messaging fee and the agent development cost, both manageable for a PKL franchise. The ROI from ticket conversion improvement on targeted campaigns versus broadcast campaigns is typically positive within the first season.
5. What fan data do Indian sports leagues typically have available for AI activation?
Most organized Indian sports leagues have ticket purchaser data (contact information, seat category, match history), merchandise purchaser data (products bought, amounts spent), and some form of digital engagement data (email opens, app logins, social engagement if tracked). This data is sufficient to build meaningful fan segments for personalized communication. The gap for most leagues is not data availability but data activation: using the data for personalized communication rather than broadcast.
6. How does AI help smaller Indian sports leagues compete with IPL's resources?
Smaller leagues (ISL, PKL, PBL, ISH) cannot match IPL's marketing budgets. AI automation reduces the per-fan communication cost by automating execution, making personalized fan communication at scale feasible with smaller teams. A PKL franchise with a marketing team of 5 people can execute personalized WhatsApp campaigns to 100,000 fans with AI assistance; without AI, the same team could only manage broadcast communication.
7. What is the biggest digital operations gap for most Indian sports leagues?
Sponsor operations is the most systematically under-developed function. Most Indian sports leagues have significant sponsorship revenue but manage sponsorship delivery tracking, reporting, and renewal preparation manually. The ROI from AI-powered sponsorship operations (comprehensive delivery documentation, automated reports, data-driven renewal preparation) is high and the competitive risk from not doing it (losing renewals due to poor documentation) is real.
8. How does regional language AI work for sports fan communication?
AI content generation tools produce first-draft WhatsApp messages, email content, and social captions in Hindi and major Indian regional languages. For a franchise like Kerala Blasters, Malayalam-language fan communication significantly outperforms English. The AI generates the first draft; a team member who speaks the language reviews and refines before sending. The AI handles the scale; the human provides the linguistic quality check.
9. What match data feeds do Indian sports leagues have access to for AI content generation?
IPL and BCCI-controlled cricket has the most developed real-time match data infrastructure. ISL has reliable match data through FSDL partnerships. PKL has match data through Star Sports and PKL's own digital infrastructure. The quality and granularity of real-time match data varies significantly. AI content generation from match data requires access to real-time event feeds (ball-by-ball for cricket, goal/card events for football, raid points for kabaddi).
10. How long does it take to implement AI fan engagement for an Indian sports franchise?
For a WhatsApp-based personalized fan communication system covering the top use cases (pre-match campaigns, match reminders, match-day customer service): 6 to 10 weeks including WhatsApp Business API approval (1 to 2 weeks), fan data integration, campaign flow design, and testing. For a sponsorship tracking system: 4 to 8 weeks. Both can run in parallel. A franchise could have both systems operational before the start of a new season with a 3-month implementation window.
Related: How Sports Teams Are Using AI for Fan Engagement in 2026 | AI Agents for Sports Sponsorship Management | How AI Is Changing Sports Marketing Campaigns
Sports Marketing AI
Raj Gupta

AI Agents for Sports Sponsorship Management: Automating the Workflows Nobody Talks About
The Short Answer
Sports sponsorship management involves significant operational work that sits entirely between the sponsorship deal signed and the revenue recognized: asset delivery tracking (did the sponsor's logo appear on the jersey for all 14 home matches?), broadcast exposure reporting (how many seconds of TV exposure did the title sponsor receive?), digital rights fulfillment (were the 50 contracted social posts published?), and renewal preparation (what did each sponsor actually receive versus what was promised?). This operational layer is almost entirely manual in most sports organizations in 2026. AI agents that automate sponsorship delivery tracking, exposure reporting, and compliance documentation are among the least discussed but highest-ROI sports technology deployments. According to SportsPro's 2025 sponsorship industry report, sports organizations lose an estimated 12 to 18% of potential sponsorship renewal revenue due to inadequate proof-of-delivery documentation.
The Sponsorship Operations Problem Nobody Talks About
Sponsorship teams spend most of their time on two things: winning new deals and managing existing relationships. What falls between these priorities is sponsorship operations: the tracking, reporting, and documentation work that proves the value the sponsor received.
The problem is systematic across sports organizations of all sizes:
Asset delivery is tracked manually. Someone on the team is responsible for checking that jersey logo placement was correct for every match, that LED perimeter board exposure ran during contracted time slots, that stadium naming rights signage was visible and undamaged throughout the season. This is done via manual review, spot checks, and checklists. It does not scale to comprehensive documentation and it does not catch every issue.
Broadcast exposure is estimated, not measured. Unless the organization has invested in broadcast monitoring tools, sponsor exposure time in TV broadcasts is estimated rather than measured. Sponsors who receive regular broadcast exposure reports based on actual measurement have significantly higher renewal rates than those who receive estimates.
Digital rights fulfillment is inconsistently documented. Contracted social posts, branded content, influencer activations, and digital advertising commitments are delivered inconsistently and documented even less consistently. Proving delivery at renewal time is often a reconstruction exercise rather than a review of real-time records.
Renewal presentations are assembled manually. The sponsorship value report prepared for renewal is typically a manual compilation of data from multiple sources, assembled under time pressure before the renewal conversation. The quality and comprehensiveness of this document directly affects renewal probability and price.
What AI Agents Automate in Sponsorship Operations
Asset Delivery Verification
AI agents with computer vision can monitor broadcast footage and match photos to verify that physical sponsorship assets (jersey logos, perimeter boards, backdrop signage) were present and correctly placed during contracted appearances. For large sports organizations with significant broadcast coverage, this replaces manual spot-checking with systematic verification.
For smaller organizations or those without broadcast monitoring tools, AI agents can process social media content, official match photos, and any available video to extract sponsorship asset visibility data.
Digital Rights Fulfillment Tracking
For contracted digital deliverables (social posts, newsletter placements, website banner impressions), AI agents monitor the organization's digital channels, identify when deliverables are published, log the engagement data (impressions, likes, shares, clicks), and compare cumulative delivery against the contracted commitment. The sponsorship manager sees real-time fulfillment status rather than reconstructing it at renewal.
Automated Sponsor Reporting
Monthly or quarterly sponsor reports summarizing delivered value are a best practice that most sports organizations aspire to but rarely achieve consistently due to the manual compilation effort. AI agents that have access to broadcast exposure data, digital fulfillment data, and asset delivery verification can generate first-draft sponsor reports automatically. The commercial team reviews and adds context before sending.
Renewal Preparation
At renewal time, the sponsorship value case needs: actual delivery versus contracted commitment, audience reach (broadcast, digital, in-stadium), engagement data, and comparative benchmarking. AI agents that have been tracking delivery data throughout the season produce this data as a structured output. The commercial team adds relationship context and negotiation strategy.
Sponsorship Automation ROI
Operational Task | Manual Effort | With AI Agent | Key Outcome |
|---|---|---|---|
Asset delivery verification | Spot checks only | Systematic coverage | Compliance documentation complete |
Digital fulfillment tracking | Manual monitoring | Automated continuous tracking | Real-time status vs end-of-season reconstruction |
Sponsor reporting | 2-4 days per report | Draft generated automatically | Higher report frequency, higher sponsor satisfaction |
Renewal preparation | 1-2 weeks | 2-3 days (review and context) | Better documentation, higher renewal probability |
Source: SportsPro 2025 Sponsorship Industry Report, Dualite sports deployment analysis
The Indian Sports Sponsorship Context
Indian sports sponsorship, particularly in IPL, ISL, and PKL, involves complex multi-brand sponsorship structures with many concurrent partners at different tiers. Title sponsor, co-presenting sponsors, associate sponsors, category-exclusive sponsors, and digital sponsors all have separate contracted deliverables.
Tracking delivery compliance across 15 to 30 concurrent sponsors per franchise, each with different contracted assets and rights, is operationally intensive. AI automation of delivery tracking is particularly valuable in this multi-sponsor environment.
Dualite builds sponsorship operations AI agents for Indian sports organizations with digital rights fulfillment tracking, WhatsApp-compatible sponsor reporting, and renewal preparation workflows designed for the Indian sports sponsorship landscape.
Conclusion
Sports sponsorship AI in 2026 is not about winning deals. It is about proving the value of the deals already won. The organizations that build systematic AI-powered proof-of-delivery will retain sponsors at higher rates and negotiate renewals at better prices. The organizations that continue to rely on manual spot-checking and end-of-season reconstructions will continue to lose the renewal conversations they should win.
Frequently Asked Questions
1. What is sports sponsorship management AI?
Sports sponsorship management AI refers to automated systems that track delivery of contracted sponsorship assets, monitor digital fulfillment commitments, measure broadcast exposure, and generate sponsor reports. The goal is to prove the value sponsors received with systematic data rather than anecdotal evidence, which improves renewal rates and negotiating position.
2. What is the biggest operational challenge in sports sponsorship management?
Proof of delivery. Most sports organizations can demonstrate that they delivered high-profile assets (title sponsor jersey, naming rights) but cannot systematically document lower-visibility deliverables (social post performance, LED board exposure time, digital impression delivery). This documentation gap weakens the renewal case and reduces the premium sponsors will pay for renewal.
3. How does AI verify that sponsorship assets were delivered?
For digital assets: AI agents monitor the organization's social channels, website, and email newsletters, identify each contracted deliverable when published, log engagement metrics, and compare cumulative delivery against contracted commitment. For physical/broadcast assets: computer vision analysis of broadcast footage, match photos, and official media can verify logo presence and placement. The level of sophistication depends on the data available.
4. What data does AI need to generate sponsor reports?
Minimum data requirements: digital publishing records (posts published, impressions, engagement), broadcast monitoring data (seconds of sponsor exposure per match), in-stadium asset delivery records (which matches featured each asset), and ticket/attendance data (audience reach for in-stadium assets). Enhanced reports add social media reach data, website traffic data, and comparative industry benchmarking.
5. How often should sports organizations send sponsor reports?
Quarterly at minimum, monthly for major sponsors and for organizations with high digital fulfillment volumes. Regular reporting serves two purposes: it builds the renewal case incrementally rather than requiring reconstruction at the end of the season, and it creates opportunities for mid-contract adjustments if delivery is running behind commitment. AI-generated first drafts make monthly reporting practical for the first time for most organizations.
6. Can AI help with sponsorship valuation for Indian sports properties?
AI can support sponsorship valuation by aggregating audience data (reach, demographics, engagement), comparable sponsorship market data, and delivery performance data into a structured valuation framework. The final valuation judgment requires commercial expertise and market knowledge that AI does not replace. AI structures the data analysis; the commercial team applies the market judgment.
7. How does AI help with sponsorship renewal conversations?
AI-powered renewal preparation organizes all delivery data from the season into a structured value case: contracted vs delivered comparison, audience reach metrics by asset type, engagement performance on digital deliverables, and year-over-year comparison where data exists. This data-driven case is significantly stronger than a manually assembled summary and allows the commercial team to lead with evidence rather than assertions.
8. What Indian sports properties benefit most from sponsorship operations AI?
IPL franchises with large multi-sponsor portfolios (15-30 concurrent sponsors) benefit most because the tracking volume is highest. ISL and PKL franchises benefit from the ability to demonstrate comprehensive delivery against contracted rights, which is critical for retaining sponsors who are evaluating ROI across multiple sports properties. Women's sports leagues benefit from the ability to generate professional sponsor documentation comparable to better-resourced male sports leagues.
9. Is sports sponsorship AI accessible for smaller Indian sports organizations?
For fundamental digital fulfillment tracking and automated report drafting, yes. The primary requirement is a systematic record of contracted deliverables for each sponsor and the ability to monitor digital publishing. Both are achievable without enterprise-level technology investment. Broadcast monitoring with computer vision analysis requires more infrastructure and is more practical for organizations with significant broadcast coverage.
10. How does AI help manage category exclusivity for sponsors?
Category exclusivity means a sponsor in a defined category (for example, only one banking partner) is protected from competing brands appearing in the same inventory. AI agents monitor the organization's digital and physical assets to flag potential category conflicts: a competing brand appearing in organic social content, an unauthorized brand appearing in audience member photography shared officially, or a retail partner using assets in ways that conflict with an existing sponsor's category rights.
Related: How Sports Teams Are Using AI for Fan Engagement in 2026 | How AI Is Changing Sports Marketing Campaigns | The 3-Layer Rule for AI Agents in Regulated Industries
Sports Marketing AI
Raj Gupta